 |
|
 |
| |
We provide:Hardware firewall, linux firewall, firewall setup, firewall software, configuration of firewall, firewall settings, firewall configuration, dmz firewall, firewall appliance, business firewall, network firewall, internet firewall, application firewall, network security firewall. |
| Essential Tips to ensure the success of your firewall instalation ....
|
| Read
more... |
|
|
|
|
|
|
Configuration
We have to decide on your Configuration
- Network Interfaces
IPCop defines up to four network interfaces, RED, GREEN, BLUE and ORANGE.
- RED Network Interface
This network is the Internet or other untrusted network. IPCops primary purpose is to protect the GREEN, BLUE and ORANGE networks and their computers from traffic originating on the RED network. Your current connection method and hardware are used to connect to this network.
- GREEN Network Interface
This interface only connects to the computer(s) that IPCop is protecting. It is presumed to be local. Traffic to it is routed though an Ethernet NIC on the IPCop computer firewall.
- BLUE Network Interface
This optional network allows you to place wireless devices on a separate network. Computers on this network cannot get to the GREEN network except tightly controlled pinholes, or via a VPN. Traffic to this network is routed through an Ethernet NIC.
- ORANGE Network Interface
This optional network allows you to place publicly accessible servers on a separate network. Computers on this network cannot get to the GREEN or BLUE networks, except through tightly controlled DMZ pinholes. Traffic to this network is routed through an Ethernet NIC.
Network Interfaces
Your firewall will need at least 1 Ethernet cable and network interface card (NIC). It may need up to 4 NICs, depending on the network configuration you choose and your connection to the Internet.
All NICs must be different physical cards (or their equivalent if you have multport cards).
Ignoring for a moment the RED network, you will have to plug a separate Ethernet NIC and cable into your firewall for each of the GREEN, BLUE and/or ORANGE network. The GREEN and RED networks are required. The ORANGE and BLUE networks are optional. The interface requirements for your RED network will vary depending on your connection to the Internet. The RED network may require an additional Ethernet card and cable.
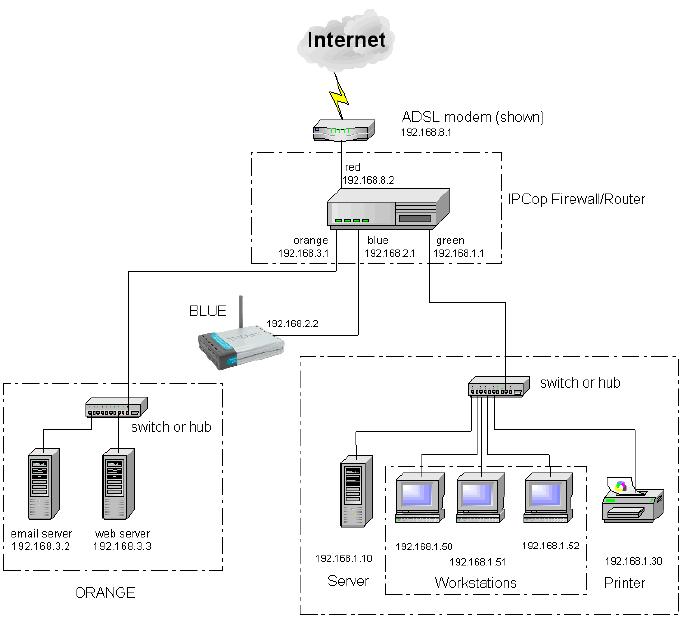
RED, ORANGE, BLUE, GREEN Configuration
The RED, ORANGE, BLUE, GREEN diagram shows that, other than the RED net, each of the networks needs an Ethernet card. If you are currently using an Ethernet connection to the Internet, you will need a card for it, too. The networks must have different network addresses. (Remember, the BLUE and ORANGE networks are optional.)
Relative Security of IPCop Network Interfaces
The security model of IPCop is that the GREEN network is fully trusted and any requests from this network, whether initiated by a user or by a machine infected with a virus, Trojan horse or other malware is legitimate and allowed by IPCop.
A new feature of IPCop 1.4.0, allows for the Intrusion Detection System to be enabled for each network interface. It is always a good idea to glance at the IDS logs for your internal networks to see if a machine on your network is behaving strangely. This may indicate a virus infection. The order of trustworthiness of networks in order of increasing trust is:
RED-!ORANGE-!BLUE-!GREEN
Network Configurations
The base configuration is RED/GREEN where IPCop protects a single internal network from the Internet. If you have a wireless access point then you can attach it to the BLUE NIC and configure IPCop to restrict the access of machines on your wireless LAN. If you have some servers that need to be accessible to the Internet you can place them in an untrusted DMZ attached to the ORANGE NIC. You should decide which combination you want for your site. Network Configuration Types
Since the RED interface can connect either by modem or by Ethernet, there are eight Network Configuration Types:
- GREEN (RED is modem/ISDN)
- GREEN + RED (RED is Ethernet)
- GREEN + ORANGE + RED (RED is Ethernet)
- GREEN + ORANGE (RED is modem/ISDN)
- GREEN + BLUE + RED (RED is Ethernet)
- GREEN + BLUE (RED is modem/ISDN)
- GREEN + BLUE + ORANGE + RED (RED is Ethernet)
- GREEN + BLUE + ORANGE (RED is modem/ISDN)
_____________________________________________________________________________________
Connecting to the Internet or External Network
How are you currently connecting to the Internet, today?
If you are connected through an external broadband modem or router, you probably will be connected via an Ethernet network interface card or NIC. In any case, a similar card must be in your IPCop PC. If you are connected via an internal analog modem, ISDN modem, or ADSL USB modem, this must be moved to the IPCop PC. If you are connected via an external dial up modem, you will have to connect it to your IPCop PC.
This hardware will be used for your RED network interface.
Write down some key parameters from your current interface.
- Check how you are currently obtaining your IP address: static, DHCP, PPPOE or PPTP.
- If you obtain your IP address via DHCP, check to see if your system has a hostname it is providing to your ISPs DHCP server, see Checking Your DHCP Host Name, below.
- Check what your name servers addresses are. Your ISPs DHCP server may provide the addresses automatically or you may need to enter them manually.
- Note any default sub domain addresses specified. These allow you to specify hosts like mail or news without entering the full host name, see the discussion in DHCP setup, below.
Checking Your DHCP Host Name
If you dont know if your ISP requires a host name, or you dont know what it is, check the paperwork that came with your ISPs installation kit or call their support center for help. If that fails, enter:
$ ifconfig -a
on a *nix platform, and look at your eth0 IP address. On Windows 95, 98, ME, etc. the command is
C:\winipcfg
entered from the command prompt. On Windows NT and Windows 2000, the command is
C:\ipconfig /all
In any case, write down your IP address and then issue an
$ nslookup nnn.nnn.nnn.nnn
command, where nnn.nnn.nnn.nnn is your IP address. If you get a response, write down the full host name you receive. The first part may be your DHCP hostname, the last part may be used to configure IPCops DHCP server. Decide On Your Local Network Address(es)
Decide what your GREEN or local network address range will be. This is not the IP address provided by your ISP. Addresses on this interface will never appear on the Internet. IPCop uses a technique called Port Address Translation, PAT, to hide your GREEN machines from outside eyes. To make sure there are no IP address conflicts, it is uggested
that you choose one of the address ranges defined in RFC1918 ftp://ftp.isi.edu/in-notes/rfc1918.txt] as private (nonroutable) addresses. There are over 65,000 of these network address ranges you can choose from. For a list of available
network address ranges, please see Appendix A . The easiest network to pick is the 192.168.1.xxx network. This will allow IPCop to handle over 250 computers. Typically routers and firewalls are placed at the top or bottom of the address range, so we suggest that you pick 192.168.1.1 for your GREEN network interface. IPCop will automatically
set your network mask based on your IP address, but you can modify it, if you need to.
If you will be using BLUE and/or ORANGE networks pick different network addresses for each of them. For example, BLUE might be 192.168.2.xxx and ORANGE might be 192.168.3.xxx. This will allow over 250 computers on each
network.
Gather information on Your Hardware
Although IPCop will automatically probe your machine for NICs, it may be necessary to input individual NIC cards configuration parameters during installation. In this case the type, IO address and IRQ number will be needed. The easiest way to configure the cards or determine this information is via a program on the floppy disk that comes with the NIC. Alternatively, check the manufacturers web site.
If you have an internal ISDN modem, IPCop will automatically probe it, too. Again, if IPCop cant determine the modem information, you will need to know the type, IO address and IRQ number of your modem. The easiest way to configure the modem or determine this information is via a program on the floppy disk that came with the card.
Alternatively, check the manufacturers web site. In addition, you will have to know the country and protocol of the connection, as well as the local phone number for your modem.
Prepare the IPCop PC
Obtain the IPCop PC. Check the IPCop Hardware Compatibility List [http://ipcop.sourceforge.net/cgibin/
twiki/view/IPCop/IPCopHCLv01] to verify the PC you are planning to use will support IPCop.
Insert any additional network cards needed to handle your configuration in the IPCop PC. You will need an Ethernet NIC for the GREEN interface. If you decide on a BLUE or ORANGE interface, you will need an extra NIC for each. If your RED interface is via Ethernet you will need one Ethernet NIC for this network, as well.
Insert the ISDN modem card, if needed.
During the installation process a video monitor will need to be attached to the IPCop PC. IPCop stays in character mode, so almost any monitor will do. The monitor can be removed after the install. In addition, a keyboard will be needed. If your BIOS keyboard test can be disabled, the keyboard can also be removed after the installation.
Set the BIOS parameters so that the target machine will operate, as much as possible, as a stand-alone server. For example:
- Turn off the CPU power saver feature; the target computer must wake on all network activity on all NICs and/or modems. Its usually easier and safer to just turn off the power saver features. You can leave the video power saver turned on.
- Set the BIOS to boot on power up.
- Turn off the BIOS keyboard test, if possible.
- Set the power state to Always restore power after power failure. This will guarantee your IPCop PC will power up and reboot after power is restored.
- IPCop can backup your configuration to a floppy disk drive. It is not uncommon for the floppy to be accidentally left in the floppy drive.
_______________________________________________________________________________
If you are installing from CD drive, make sure your system will only boot from the CD drive and hard drive. Turn off all types of boot, except your hard drive after installation completes.
| |
|
 |
|
 |
| |
|